Discovering Google Tag Manager: presentation, usefulness, advantages
Do you want to monitor and measure the performance of your website, your products and your marketing campaigns?
Discover Google Manager, a very useful tool that will allow you to track many data easily!
What is Google Tag Manager (GTM)?
Google Tag Manager (also known as GTM) is the ideal tool to collect all the useful data to manage and improve your marketing.
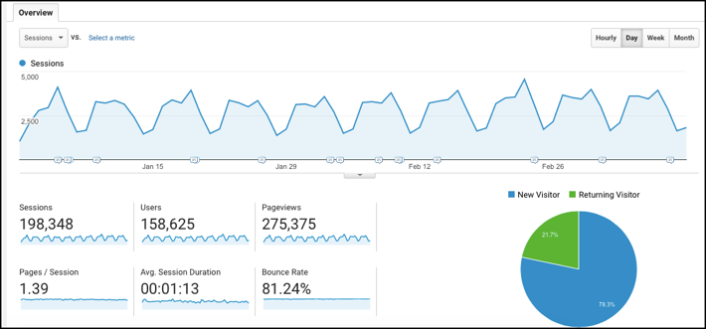
If you use Google Analytics (or another web analytics tool), you already track certain data: number of page views, bounce rate, average visit duration, traffic sources, etc.
Although very useful, this information quickly finds its limits. Almost nothing about how users behave on your website. Almost nothing, either, about how they interact with your content or marketing campaigns.
Isn’t it frustrating to have no information about what people are doing on your site and how your campaigns are performing? Wouldn’t you like to know more about how your visitors’ buying journey unfolds? Know what they are clicking on? Are they interested in your content? If they convert through your newsletters or AdWords campaigns? Is there anything that catches their attention? Are there any blocking elements?
Thanks to Google Tag Manager, your customers’ behaviour could be no longer a secret for you.
You will be able to track all kinds of data, such as :
- CTAs clicked;
- The best-selling products and categories and their generated turnover;
- Subscriptions to your newsletter;
- AdWords conversions;
- Clicks on a given product;
- Downloads of a document (PDF, white paper, etc.) ;
- Clicks on “add to cart”;
- Products removed from the basket;
- The use of a discount coupon;
- The depth of the scroll in the page;
- Shopping cart abandonment in the checkout tunnel;
- The triggering and playback time of a video ;
- …
Normally, getting all this data into your web analytics tool (such as Google Analytics) requires the intervention of a web developer to implement one-by-one pieces of code on the different pages of the site.
Code to track abandoned carts, code to track the number of clicks on a CTA… the more data to track, the more difficult it becomes to find your way around! All this code then becomes complex to manage for the developer who is, in addition, often busy on other projects.
But, thanks to Google Tag Manager, you don’t need a developer anymore! It allows the marketing team to collect specific data on customer behavior, product performance and marketing campaigns independently.
How do you do it?
Because Google Tag Manager offers the possibility to implement code snippets on your website through a single interface… without even touching the source code of the page.
To do this, Google Tag Manager uses tags (or tracking tags). These tags are types of information that tell Google Tag Manager what data it should collect.

Simplified diagram of how Google Tag Manager works: information from a data source (e.g. your website) is shared with your web analytics tool (e.g. Google Analytics) via Google Tag Manager.
Formally, tags are code snippets provided by third-party tools, such as Google Analytics, Google AdWords, Facebook or Twitter.
As an example, here is what a Google AdWords conversion tracking tag looks like:
<!-- Code Google pour la page de conversion d'achat --> <script type="text/javascript"> /* <![CDATA[ */ var google_conversion_id = 1234567890; var google_conversion_label = "xxx-XXx1xXXX123X1xX"; var google_remarketing_only = "false" var google_conversion_value = 10.0; var google_conversion_currency = "USD" /* ]]> */ </script> <script type="text/javascript" src="//www.googleadservices.com/pagead/ conversion.js"> </script><noscript> <img height=1 width=1 border=0 src="//www.googleadservices.com/pagead/ conversion/1234567890/ ?value=10.0¤cy_code=USD&label=xxx- XXx1xXXX123X1xX&guid=ON&script=0"> </noscript>
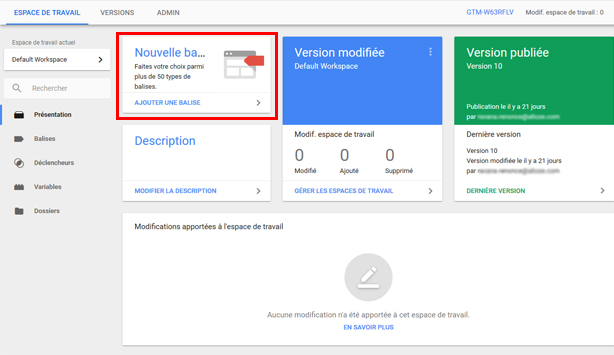
In Google Manager, many tags are pre-set, making it very easy for the marketing team to create them. Once connected to the interface, simply click on “add a new tag”:
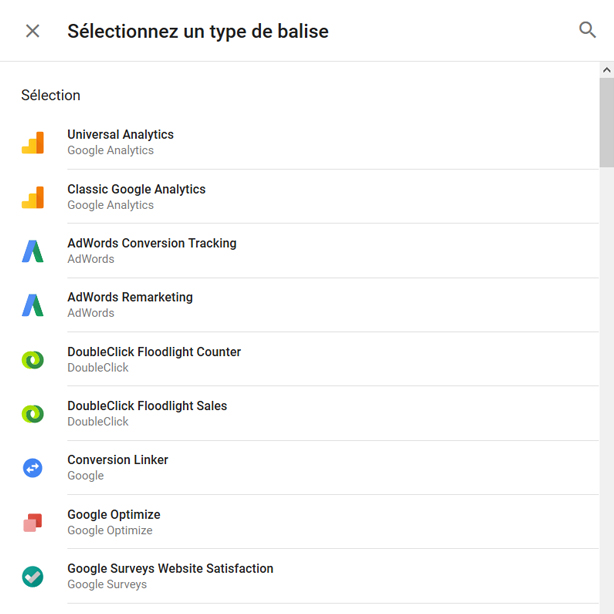
then select the tag you want according to the information you want to collect.
The common tags available in Google Tag Manager allow you to collect the following data, for example:
- Universal Analytics;
- AdWords Remarketing ;
- AdWords conversion tracking;
- Heatmap tracking (Hotjar, CrazyEgg, etc.) ;
- Facebook Pixels.
Let’s take a slightly more concrete example.
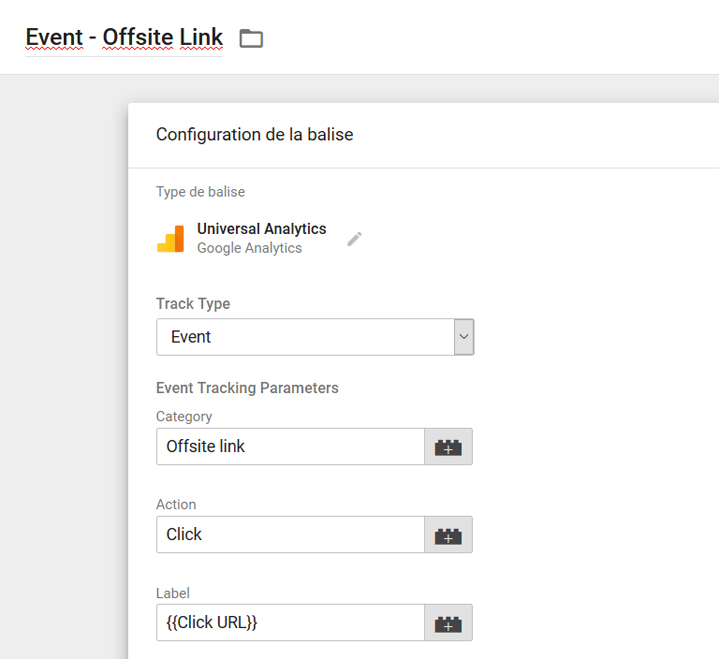
Let’s say we want to measure the number of outbound links clicked on your site. In Google Tag Manager, you will have to give a name to your tag (“Event – Offsite Link” in this example), choose the type of tag (“Universal Analytics” in this case) and the type of tracking you want (“event”); then set up the tracking of the event by choosing :
- The category of the event (we chose Offsite Link in this example)
- The action of the event, i.e. the action performed by the user (click in this example)
- The event label (optional), which will allow you to identify your event
The data configured in Google Tag Manager is then displayed in Google Analytics reports.
To access it, you will need to click on Behavior > Events > Top Events > Offsite Link.
Differences between Google Tag Manager and Google Analytics
As you can see, Google Tag Manager and Google Analytics are two completely different tools that can work independently of each other.
Google Tag Manager is only intended to store and manage third-party code. It allows you to collect specific data easily by creating tags.
Google Analytics is a web analytics tool used to view the data you have chosen to collect with Google Tag Manager. It allows you to make reports and analyses by filtering the collected data (conversion, personalized segments, e-commerce transaction, bounce rate, time spent on the page, etc.).
Discover also which KPI to choose for your e-commerce
Google Tag Manager : introduction
In order to get started with Google Tag Manager and properly configure your tags, you will need to familiarize yourself with these basic concepts first:
- Container ;
- Trigger;
- Variable, operator and value.
Container
When you start using Google Tag Manager, the first thing you need to do is create a container. A container “contains” all the tags of your site.
After creating a new container, GTM gives you a code to implement. This code must be added to the source code of your site.
Some CMS, such as WordPress, have plugins to help you add the container code (e.g. DuracellTomi’s Google Tag Manager for WordPress), but you may need to ask a web developer or your webmaster for help to add it.
Once this is done, you will be able to create, modify, deactivate or delete your tags independently via Google Tag Manager.
Trigger
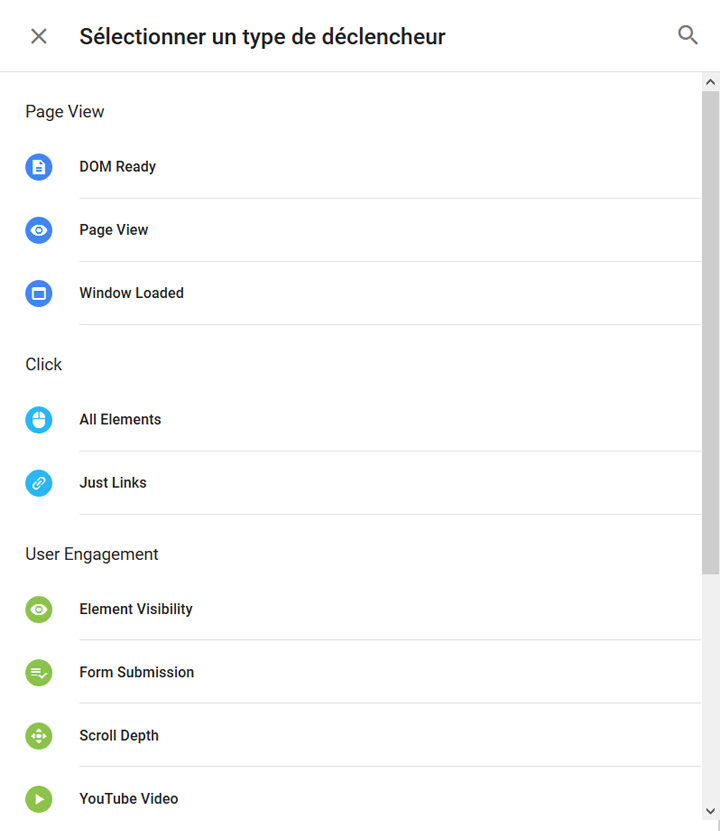
A trigger tells Google Tag Manager when, how and under what conditions a tag should be triggered so that data can be sent to your web analytics tool. To be triggered, a tag must be associated with at least one trigger.
On your site, your tags are used to measure a specific interaction, such as when someone downloads a file or views a video, when someone clicks on a CTA or when a form is submitted.
In Google Tag Manager, each of these interactions is called an “event.
When setting up a trigger, you can choose the event you want to track.
Once you have chosen the triggering event to track, you will need to set up its triggering conditions.
There are three conditions:
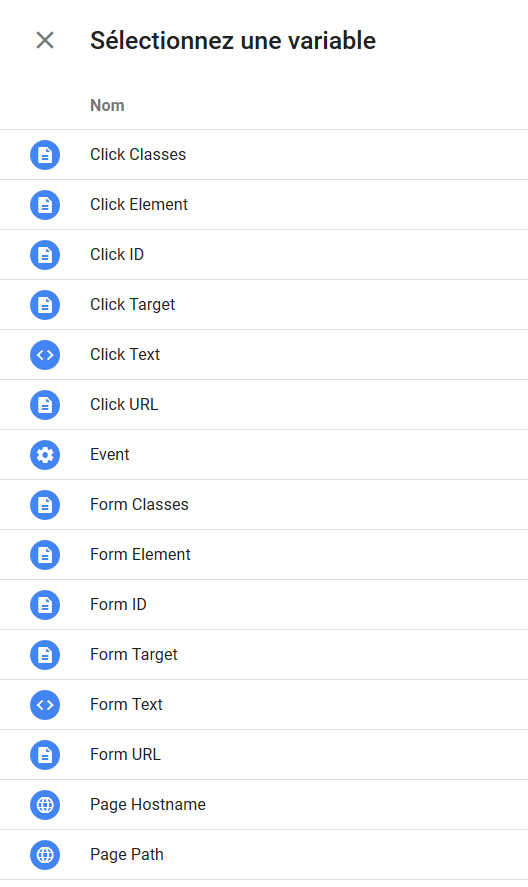
- Variable: just as each tag is associated with a trigger, each trigger is associated with a variable. More concretely, the variable is a rule that will condition the triggering of the tag.
- Operator: it indicates if an event must contain, be equal, superior or inferior to a certain value.
- Value: this is the condition that must be met for the trigger to operate. Note that while the word “value” usually refers to numbers and prices, in Google Tag Manager it is not necessarily a numerical value. In most cases, your value will be a URL or a keyword.
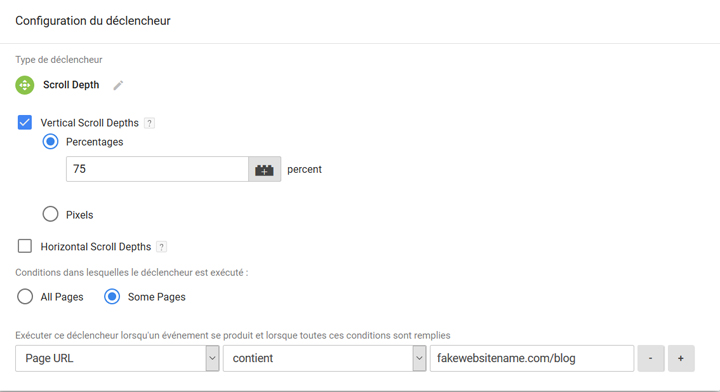
As anexample, let’s say you’re looking to find out how many people are reading your blog content in depth. You will be able to create a tag with a scroll depth event trigger, which will be triggered when the vertical scroll depth reaches, for example, 75%.
Since you are focusing exclusively on the content of your blog, you will then state the following conditions:
- Variable: “Page URL
- Operator: “contains
- Value: “fakewebsitename.com/blog
To give you another idea of what you can do by configuring a trigger, you can, for example, require a user to add a certain quantity of products to their shopping cart for the tag to be triggered.
In some circumstances, you may also not want a tag to be triggered. In this case, you can create a trigger exception to prevent the tag from being triggered on these occasions.
For example, if you have a tag on all your pages, but you don’t want it to fire on specific pages, you can use a trigger exception to prevent it from firing on those few pages.
Advantages and disadvantages of Google Tag Manager
✓
With predefined tags, and the ability to create custom ones, the types of data to track are virtually unlimited.
✓
Marketing teams can set up the data tracking they need to drive their strategy and improve their campaigns themselves, without needing a developer to do it for them.
✓
Adding, editing and deleting tags is very easy, especially for tracking basic events like PDF downloads, outbound links or CTA clicks.
✓
Tags created in Google Tag Manager load asynchronously, which prevents slowing down the site load time if you have many tags and one of them takes a while to load.
✓
All the tags are gathered and manageable in one place.
✓
Google Tag Manager works with other non-Google tools.
✓
A preview and debugging mode allows you to see what works and what doesn’t before you do anything.
❌ The code is injected directly into the site, which means that there is a possibility of “breaking” it.
❌ Technical knowledge is required in case you want to create more complex custom tags to collect specific data. You will then need to call on a developer or a web agency.
In short, thanks to Google Tag Manager, the tracking possibilities seem almost endless! It’s a great tool that reduces the amount of work for the developer, while making life easier for marketing teams.
Note however that the more data you have to track, the more complex the management and maintenance of tags becomes.
To help you, don’t forget to create (or update) your tagging plan before you start using Google Tag Manager!
To go further :
- Google Tag Manager Getting Started Guide
- Google Tag Manager Introduction Video:
Did you like this article?
Subscribe to our newsletter and you will receive our other articles once a month in your mailbox



Leave a Reply
You must be logged in to post a comment.